How Do You Install & Adjust The XS Sights, F8 Night Sights On Your Handgun?

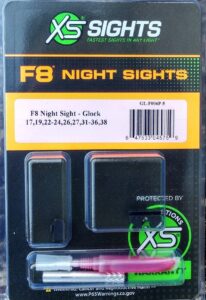
There are many types of sights being made today, but what type of sights work well on a self Defense (SD) handgun? I love my Glock handguns but the one thing I do not like are the plastic sights. So that is one of my first upgrades that I want to change.  I really like the XS Sight Company as I feel they have very high quality sights at a somewhat reasonable price. I was looking on Amazon a while back and found a new style of XS Night Sights that I thought might just work for me and besides they were at a very reasonable introductory price. So I thought I would give them a try. I bought three for my Glocks, my Glock 19, 30 and 20. Most of my discussion will be about my Glock 19 (9mm), so let’s talk about it.
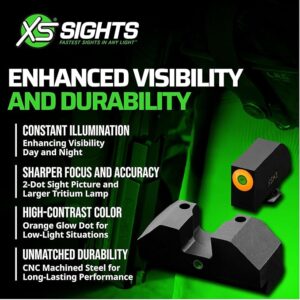
How Do We Install These Night Sights?

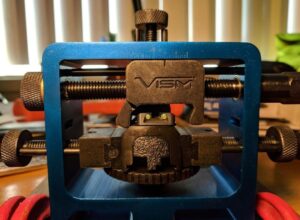
I made a product review on a VISM Sight Pusher back in 3/14/2022. The VISM Universal Pistol Rear Sight Tool is designed for the removal, installation, and adjusting of windage of dovetailed rear sights for most Semi-Auto Pistol slides. The Universal Pistol Rear Sight Tool works with many types of semi-auto slides: full, compact, subcompact, and pocket-sized semi-auto pistols. The base platform is adjustable for height, to get your slide and rear sights at the proper height for the rear sight pusher. Includes one bottom spacer for some pocket pistol slides for proper height alignment. The multiple vertical and horizontal clamps secure various sizes and types of semi-auto slides in the tool. The adjustable top brace with a plastic insert to secure the slide’s vertical placement on the base platform. The adjustable side braces with plastic inserts secure the slide’s horizontal placement on the base platform. Includes two sets of side plastic inserts: a pair of flat inserts and a pair of stepped inserts to fit a wide variety of slide profiles.
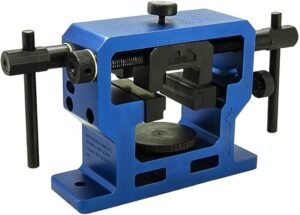
Old Rear Sight Removal
    • Field-strip your handgun so that you only have your slide (barrel and spring removed).
    • Place your slide in the VISM Sight Pusher so that you are pushing your old sight from left to right.
    • Begin to screw the sight pusher a little at a time until your old sight comes out.
    • Clean out the sight dovetail to remove any excess grease, etc.
Old Front sight Removal –
    • While the Glock is field-stripped you can also remove the front sight, it is a screw-on using a 3/16″ nut, the screw is on the inside of the slide.
    • Get a 3/16″ nut driver and remove that flat screw on the inside of the slide and the front sight should come off.
    • Get a cloth and wipe the slide hole , inside and out.  
New Sight Installation –
    • Remove the new sights from the packaging and see what you have to work with.
    • You should have a front and rear sight, an Allen wrench for rear sight windage adjustment, a nut driver for front sight installation, and some Loctite (Blue so it can be removed if necessary).
    • I always use my own Loctite (Blue 242) so I know exactly what I am putting on.
  •  
  • New Front Sight Installation-
    • The front sight should have the same flat screw that the old sight had.
    • Unscrew the screw in the new sight and put a small amount of Loctite on the screw.
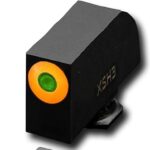
    • Place the front sight over the hole and put the screw through the hole and into the front sight.  (Make certain that the front sight is on the correct direction).
    • Using a 3/16″ nut driver, tighten the screw snugly, but not over-tight. Also make certain that the sight is straight and not slanted.
New Rear Sight Installation-
    • Reposition the slide in the sight pusher so that the sight pusher is pushing the new sights from the right to the left.
    • Set the new Night Sight in the dovetail and slide it to the right into the dovetail. It should slide into the dovetail 1/4 to 1/3 of the way into the dovetail, or further fitting will be required.
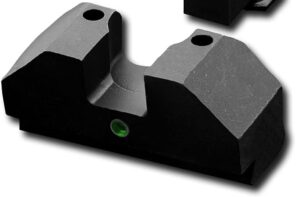
    • Further fitting means to remove some of the bottom of the sight using either a sharpening stone or a good file.  This needs to be done very slowly, removing some of the metal a little at a time.  Then try it again until you can slide the sight into the dovetail far enough.
    • Begin to screw the sight pusher a little at a time until your new sight is even on both side of your slide.
    • Once adjusted where you want it, get your enclosed Allen wrench and tighten both screws until it is snug (BUT NOT OVER TIGHT).
    • If your new sight does not move into the dovetail very easily you may need to add some oil to the dovetail, this might help it move into the dovetail.
    • Now that your new sights are in place, put your handgun back together and add some oil to the lubrication points as your manual states and get ready to test fire your handgun.

Before you shoot the handgun

Before you shoot your handgun, you need to make sure that you grip your handgun in the proper manner.  A poor grip means in accurate shot placement. Checkout the information below:

Proper Handgun Techniques: 

Your hand position on the grip of a handgun is vital to hitting the target. Although the grip configurations of the revolver and the semi-automatic pistol are different, the gripping procedure is the same.

  • Right-handed shooter-
    • The right hand is the “strong” hand and the left hand is the “support” hand.
  • Left-handed shooter-
    • The left hand is the “strong” hand and the right hand is the “support” hand.
  • Whether you are right or left handed, hold the handgun high on the grip with your strong hand so that the recoil is directed back to the hand and arm in a straight line. This allows better repeat shots and more accurate shooting.
    • When shooting a semi-automatic, the rear extension of the frame limits how high your hand can be placed.
    • When shooting a revolver, your hand might be able to hold onto the gun quite high.
There are two primary components to a proper handgun grip: a firm grip with your dominant hand and reinforcement from your non-dominant, or support, hand. The thumbs-forward grip is one of the most widely taught techniques for semi-automatic pistols because it provides excellent recoil control.
Dominant hand technique
The goal with your dominant hand is to create a high, firm grip to maximize leverage and control over the pistol.
  • High grip: Position the web of your hand as high as possible on the back of the pistol’s grip, just below the slide. This helps reduce muzzle flip.
  • Finger placement: Wrap your three lower fingers firmly around the front of the grip. The index finger should remain outside the trigger guard, resting straight along the side of the firearm until you are ready to shoot.
  • Pressure: Apply firm pressure from front to back, using the heel of your palm and your lower fingers to squeeze the grip. 
Support hand technique
The support hand fills the empty space on the grip and provides additional surface contact for stability and recoil management. 
    • Hand position: Point your support hand forward, then rotate it downward at about a 45-degree angle. This creates a “clamping” effect.
    • Fill the gap: Place your support hand firmly against the grip, covering any empty space on the side of the gun. The palm of your support hand should be in contact with the fingers of your dominant hand.
  • Thumbs forward: For the “thumbs-forward” technique, both thumbs should be pointing straight toward the target, resting on the side of the pistol frame. 
Two-handed grip assembly (thumbs-forward technique)
  1. Begin by gripping the gun with your dominant hand, getting as high as possible on the backstrap.
  2. Bring your support hand up and fill the gap on the front and side of the grip.
  3. Place your thumbs forward along the side of the frame, roughly parallel to the barrel.
  4. Apply inward pressure with both hands: the dominant hand provides front-to-back pressure, while the support hand applies side-to-side pressure. 

Good Shooting Techniques

Good shooting techniques to me means minimizing things that will cause you to move the handgun when you pull the trigger.

    1. Focus on the sights as you shoot
      1. Place the front post in the rear notch with the top of the post even with the top of the rear notch.
      2. Then focus on the front sight when you aim.
    2. Squeeze the trigger.
      1. Do not jerk the trigger, squeeze the trigger
      2. There should be no movement of the sights when you pull the trigger.
    3. Breathing correctly
      1. I like to take a breath and then exhale very slowly and squeeze the trigger as I exhale.
    4. All of this takes practice to get it right.

 Once your grip and trigger technique are solid, start focusing on the sights during live fire – the front sight in particular.

Time For A Test Fire, let’s figure out the correct procedure

Installing new sights is a good thing but you need to get them to where they are hitting what you aim at. So you need to get to a place where you can test fire your gun and see where it is hitting. I like to use a large target with white paper behind it that covers all your previous bullet holes. Because you may not even hit the target with your first shots and this helps you know where the bullets are hitting..

I like to begin at 15 yards with a rifle or handgun, using a table to shoot from, with a stand or rest for support (see photo below), a rest like this works for handguns or rifles and helps to remove most of the other movements so you can see exactly where your handgun is shooting. 
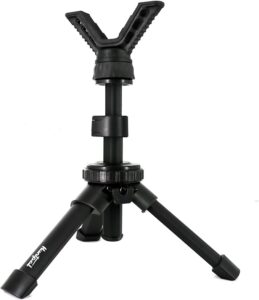
Using good shooting technique, you shoot a 3-rounds group and then go see where you shot.   If you are hitting on paper or on the target then you keep going.  You make an adjustment (see the next section). 

So An Adjustment Is Needed

What do you do when an adjustment is needed? An adjustment up or down is called elevation and an adjustment left or right is called windage.  The XS Sights – F8 Night Sights adjust easily for windage but elevation is a bit harder.

Adjusting For Elevation:

The F8 sights are not adjustable for elevation, only windage.  The only thing you can do is see if you can adjust the height of the front sight.

Adjusting for windage:

When I am at the range and need to make a sight adjustment, I do not completely remove the slide from my handgun. I unload your handgun by removing the magazine and rack the slide until no more bullets are ejected. Open the action and visually look to see if any bullets are present, now you are ready to make a sight adjustment. If a windage adjustment is needed, you move the rear sight in the direction that you need the bullet to go.

    • Loosen both securing screws in your rear sight.
    • Place the slide into the sight pusher tool. This tool can be used to install and adjust Glock sights, making the interchange of suppressor and RMR-height sights a breeze. When adjusting your rear sight, the sight pusher tool has a scale that allows for precise adjustment. This lets you track how much you’ve moved the sight. Moving the sight left and right will adjust windage only. 

Once you are on the target then you can move back to the 25 yard mark and begin again. 

Let’s Do Some Final Adjustment

At this point your bullets should be getting close to where you need  them to be, so any adjustments made should be very small ones.  At this point I like ti shoot 5-shot groups and squeeze that trigger.  Then after a couple of 5-shot groups you should be done. Now if after all that work you find out that you do not like the sights themselves then go find the ones that you would rather have and put them on.  Take care and enjoy those new sights!

Final Comments

Installing new sights on your handgun is great but you must also spend the time to get your point of aim right.  If you follow the steps I talked about, you will have that done and done correctly.

If you have any questions about this post or anything related to Everyday Carry (EDC)/Concealed Carry, feel free to leave a comment below and I will be happy to get back to you.

All the best,

Larry

Founder of Everyday Carry Essentials
    LEAVE A REPLY

    Your email address will not be published
    Required fields are indicated

    RAPTOR SLING BAG

    Product Review

    A Very Nice Sling Bag

    Product: Raptor Sling Bag

    Price: $59.98

    Durability: Very High

    Best Place To Buy This Product: https://dinosaurized.com/

    My Overall Rating: 9.5

    Quick Product Overview:

    This Raptor Sling Bag is a discreet, stylish, and highly-functional bag for your everyday carry needs. It is perfect for individuals who need a versatile, stylish, and secure option for transporting their daily essentials, including a concealed firearm, while navigating city life. It is ideal for hikers, campers, and hunters seeking a durable and organized way to carry essentials, from navigation tools to self-defense gear. This bag is highly durable, it is crafted from robust 1000D water-resistant nylon. It includes tailored compartments for gear, magazines, and more and it is ergonomically designed for all-day wear. For those who prioritize personal safety and wish to carry their firearm discreetly and comfortably throughout their daily activities, this bag is designed for inconspicuous concealed carry. It has intuitive retrieval of your handgun in moments. There is a silent cord that pulls on two-way zippers so you can get to your handgun quickly.. This bag has a removable gun holster that can be positioned for versatility, it is also available for right or left-handed shooters.

    Specifications Of This Product:

    • Dimensions:
      • 10 inches in height,
      • 8 inches in width, and
      • 3.5 inches in depth.  
    • Material:
      • Tough 100% Polyester 1000D
      • PVC coating for durability and water resistance. 
    • Zippers:
      • Smooth action
      • Silent two-way zippers for quick access.
    • Holster:
      • A universal, adjustable pistol holster
      • Hot-pull strap for quick access.
    • Storage:
      • Removable holster in the main pocket.
      • Elastic bands for securing magazines.
      • Multiple compartments for organizing accessories and gear.
      • Front pockets for essentials like a phone.

    What I Like About This Product:

    This is the best sling bag for anyone serious about firearms. but it can be used for as a regular bag without a handgun present. The discreet design keeps everything low-profile, it looks like a regular bag, but it allows me to access my firearm quickly and smoothly when needed. It has great pockets for organization including elastic bands positioned for my magazines. The Raptor Sling Bag is sturdy, water-resistant, and the dedicated holster spot with the hook & loop attachment is a brilliant touch. 

    What I Would Change About This Product:

    Nothing yet

    Final Remarks:

    This Raptor Sling Bag is compact & lightweight and designed to hold your essentials without adding bulk. This bag is very versatile, is suitable for various uses, including hiking, biking, everyday carry (EDC), and concealed carry. There is a tactical component to this bag, it features a universal gun holster and durable, water-resistant construction. Whether you utilize concealed carry or not, this bag can work great for you.  Put it on your chest, your back or over your shoulder, this Raptor bag just works.  Try it,  I bet you will like it!

    If you are interested in this product, click here.  If you are interested in similar products, click on the link below and it will take you to my EDC Concealed Carry Sling Bag page, Thanks for reading this product review.

    Go To EDC Concealed Carry Sling Bags.

    If you have any questions about this product review or anything else related to Everyday Carry (EDC)/Concealed Carry, feel free to leave a comment below and I will be happy to get back to you.

    Thanks,

    Larry

    Founder of Everyday Carry Essentials

      LEAVE A REPLY

      Your email address will not be published
      Required fields are indicated

      How To Make A DIY Brass Catcher?

      Many of you may wonder what the heck is a brass catcher?  Well those of you that shoot firearms know the answer to that question.  But I must preface this with this comment – if you are shooting for fun and do not reload your ammo then you may not need to save your brass. But if you reload like I do then saving your brass casings is completely necessary.

      If we are shooting a revolver, it is easy to extract your shells from the cylinder and put them in a container. But if we are shooting a semi-automatic handgun, the brass shell casings will shoot out of the ejection port of your firearm and collect on the ground.  So instead of picking up the shells by hand, I have made a brass catcher to either stand on the folding table that I use or it will attach to a tripod in a free standing manner. So let’s explore this topic.

      Why Use A Brass Catcher?

      When people shoot firearms, it usually happens in three ways; 1) You have a place on your property to shoot your firearms 2) You know someone else who will let you shoot on their property or 3) You have to go to a shooting range of some sort and pay their fees to shoot your firearms. Regardless of where you go, you will need to pick up your brass shells from the ground so you either use a brass catcher or you have to pick up all the brass that your firearm ejects by hand and that will take a while. So using a brass catcher saves you time and is much more efficient.

      Why Not Just Buy One?

      There are many brass catchers on the market today and it would be a lot easier to just buy one rather than make one. There are a couple different types of brass catchers, one that attaches to your firearm and one that is more universal in nature and stands on your tables and catches the brass as you shoot your weapon. I am looking at a universal brass catcher that can work with many different firearms, handguns and rifles. This first one is made by CTK Precision and costs $65.00.  It looks to be adequate but I have not tried it. The second one is made by Caldwell and it costs $49.89 and it too looks like it would do the job. So then why not buy one?  I guess you could say I am kind of a tight-wad  and a bit of an engineer-type and if I can make one just as good (or better) then why not do it. Besides I don’t know about you but I get a lot of personal satisfaction from doing things myself, rather than just buying one.

      What Do You Need To Build One?

      So now that you are considering building one, what tools and supplies do you need to make one.

      Let’s look at the tools that you will need:

        • PVC pipe cutters
        • Pliers
        • Side cutters
        • Cordless drill
        • Drill bits
        • Tap & die set

      Now what supplies will you need:

        • PVC Glue
        • 1/2″ PVC pipe
        • 4-90 degree slip fittings
        • 2- 1/2″ PVC slip tee fittings
        • 20-plastic clamps
        • Netted laundry bag
        • Bag of zip ties

      How Do You Build One?

      Now that you have all of your tools and supplies that you will need, what next?

        1. Draw a simple sketch of what the brass catcher looks like
        2. Then cut the PVC pipe to the desired length and lay them out on a flat table so you can see how it will go together.
        3. Place your fittings on the table next to the pipe
        4. Glue your fittings and pipe together in the configuration that it needs to be.

      How Does It Work?

      I originally designed it to work free-standing using a camera tripod when you are standing up shooting or on a table as a table-top brass catcher, when you were sitting down at a table when you were shooting. The most difficult thing to figure-out is where to place it so you can catch the brass as it comes out of your handgun. It takes a little adjustment to get it catching most of your brass.

      When using different handguns, the brass comes out at different angles. So do you put it close so that you catch it right out of the gun or do you move it away and catch it as it is falling down?  I had better luck moving it close and catching it right out of the gun, it catches the brass more consistently.  So since I use a table most of the time when I shoot, using it table-top style worked best for me. 

      Final Comments 

      Did it work – yes it did! Did I catch every piece of brass that I shot from my handguns – NO, and I never figured that it would. As you shoot your handguns, the brass that it coming out of your handgun may vary in the angle that it comes out.  So you may have to change the position of your brass catcher, that way you can catch the majority of the brass and that is still better then picking it up off the ground.  As the brass comes out it may hit the frame of the brass catcher and then bounces off of your table and hits the dirt below.  Then you can look for them and pick them up. Am I glad I spent the time to make this brass catcher – Absolutely!  It reminds me of a small soccer goal and works the same way.  If you are in need of something like this, give me a shout in the comment area and I can give you some pointers.

      If you have any questions about this post or anything related to Everyday Carry (EDC)/Concealed Carry, feel free to leave a comment below and I will be happy to get back to you.

      All the best,

      Larry

      Founder of Everyday Carry Essentials

        LEAVE A REPLY

        Your email address will not be published
        Required fields are indicated

        HOLTZMAN GORILLA SURVIVAL REDLINE FIXED BLADE KNIFE

        Product Review

        Nice Survival Knife

        Product: Holtzman’s Gorilla Survival Knife

        Price: $139.95

        Durability: High

        Best Place To Buy This Product: Amazon.com

        My Overall Rating: 9.0

        Quick Product Overview:

        The Holtzman Gorilla Survival Knife is made of D2 Steel and is among the finest quality available, with edge retention like no other. It cuts wood, rope, twine, aluminum and all without fear of a dulled blade. With the sturdiest drop-point blade to the perfectly dialed-in thumb studs, Holtzman’s Gorilla Survival Knives are built to be carried and used. The G10 pocket knife was designed for maximum control and anti-slip grip, meaning you need never fear for loss of control. It comes with sharpening stones that will make sure your blade is always razor sharp and the carrying case will keep your EDC knife safe and always at hand.

        Specifications Of This Product:

        Recommended Uses For ProductCamping
        Brand NameHoltzman’s Gorilla Survival
        Model NameThe Bushwhacker
        Age Range DescriptionAdult
        Included ComponentsFire Starter
        Model NumberOS-H94I-UDII
        Global Trade Identification Number00365162601015
        Manufacturer#1 BEST
        UPC365162601015
        Customer Reviews
        4.5 out of 5 stars
        Best Sellers Rank
        ASINB0B9JWS8YF
        Measurements
        Blade Length5.62 Inches
        Item Weight1.1 Pounds
        Item Length11.22 Inches

        What I Like About This Product:

        This knife is very high quality, and is extremely heavy-duty.  It is very sharp right out of the box, and it fits your hand amazingly well. It comes with a great secure Kydex sheath, and a great survival tool for campers. backpackers and other outdoor enthusiasts.  It comes with a ferro rod and striker,  paracord and Allen wrench for starting fires.

        What I Would Change About This Product:

        I just got it so I have not used it enough to have that knowledge.

        Final Remarks:

        This knife is a bit longer then the normal knives that I review.  I was given this knife as a gift so I thought I should just review it anyway.  Would it work as an EDC item – Maybe!  Would I wear it on a daily basis – No!  It is a great knife to use when camping or hunting but I would not want to wear it on a day to day basis.  Beside with a 5.52 inch blade, the police might have something to say about wearing it.  But that aside, it is a very good survival-type knife and can do about anything that you need done in the outdoors.  You might want to check it out if you have a need for one.

        If you are interested in this product, click here.  If you are interested in similar products, click on the link below and it will take you to my EDC Fixed Blade knife page, Thanks for reading this product review.

        Go To EDC Fixed Blade Knives.

        If you have any questions about this product review or anything else related to Everyday Carry (EDC)/Concealed Carry, feel free to leave a comment below and I will be happy to get back to you.

        Thanks,

        Larry

        Founder of Everyday Carry Essentials

          LEAVE A REPLY

          Your email address will not be published
          Required fields are indicated

          KIZER DROP BEAR FIXED BLADE KNIFE

          Product Review

          Great Little Knife

          Product: Kizer Drop Bear Fixed Blade Knife

          Price: $39.98

          Durability: Very High

          Best Place To Buy This Product: Amazon.com

          My Overall Rating: 9.0

          Quick Product Overview:

          The Kizer Bear Fixed Blade knife is crafted from D2 drop point steel (HRC 58-62), the horizontal carry fixed blade hunting knife delivers outstanding hardness and edge retention for lasting durability and wear resistance; Long spine jimping and wide finger choil offer a secure grip, while the front jimping near the tip provides non-slip control for precise cuts, even in wet conditions The Kydex sheath of the small EDC fixed blade knife features adjustable tension and supports multiple carrying styles—horizontal, vertical, or neck carry with the included paracord; Whether for EDC or any outdoor adventure, it ensures a secure and comfortable carry to suit your needs.

          Specifications Of This Product:

          Model: Drop Bear
          Model Number: 1094A1
          Overall Length: 6 ” / 152.5mm
          Designer: Azo
          Blade Style: Drop Point
          Blade Length: 2.57 “/ 65.2mm
          Blade Thickness: 0.12 “/3mm
          Blade Material: 14C28N
          Blade Finshing: Satin
          Blade Grind: Flat
          Handle Length: 3.44 “/ 87.3 mm
          Handle Material: Black G10
          Weight: 2.4 oz/ 68g
          Color: Black
          Hardness: 58-59


          What I Like About This Product:

          This small Drop Point Knife appears to be of good quality with a fairly sharp blade,  I did need to touch up the blade with my ceramic sharpener to bring out the true sharpness of this knife but once sharp it has held an edge well. It is a well made knife with an excellent fit, and a good grip. This is a nice addition to my EDC gear. The Kydex sheath seems to be very secure and works well.

          What I Would Change About This Product:

          Nothing yet

          Final Remarks:

          The Kizer Drop Bear EDC Fixed Blade Knife with sheath features a black G10 handle with a non-slip texture for a secure grip in any condition; It includes two sets of tweezers and toothpicks, with one set cleverly concealed in a hidden slot until needed—perfect for removing splinters, prepping food, or handling small tasks The Kizer Drop Bear Fixed Blade Knife can work well for EDC, Camping, or any other outdoor task. This knife is a bit on the small side for my tast but it is a good knife, give it a try, you might like it.

          If you are interested in this product, click here.  If you are interested in similar products, click on the link below and it will take you to my EDC Fixed Blade knife page, Thanks for reading this product review.

          Go To EDC Fixed Blade Knives.

          If you have any questions about this product review or anything else related to Everyday Carry (EDC)/Concealed Carry, feel free to leave a comment below and I will be happy to get back to you.

          Thanks,

          Larry

          Founder of Everyday Carry Essentials

            LEAVE A REPLY

            Your email address will not be published
            Required fields are indicated

            ALZAFASH HORIZONTAL CARRY EDC FIXED BLADE KNIFE

            Product Review

            Very Nice Horizontal Carry Knife

            Product: Alzafash Horizontal Carry EDC Knife

            Price: $29.99

            Durability: High

            Best Place To Buy This Product: Amazon.com

            My Overall Rating: 9.0

            Quick Product Overview:

            This Alzafast fixed blade knife features a 1095 high carbon steel blade, known for durability and edge retention. This knife is crafted for durability, it is a full tang knife offers superior balance and resilience. Whether you’re cutting, carving, or using it for outdoor purposes, this bushcraft knife delivers reliable control and efficiency in nature. The horizontal carry knife comes with a premium sheath for easy belt attachment, ensuring quick access during hunting, camping, or outdoor activities. The ergonomic wooden handle of tracker knife with a finger ring provides a secure and comfortable grip. It is ideal for bushcraft, hunting, and survival, it’s designed to handle outdoor tasks with ease.

            Specifications Of This Product:

            Blade Steel: 1095 High Carbon Steel

            Lock Type: Fixed Blade

            Blade Length: 4.5 inches

            Open Length: 8.5 inches

            Blade Finish Color: Black

            Handle Material: Rosewood

            Use: Camping, Bushcraft, Hunting, and Survival

            Origin: Pakistan

            What I Like About This Product:

            This fixed blade knife appears to be well-made and the blade was extremely sharp right out of the box. It is built of quality and very sturdy and should last a long time. The sheath is nice quality and designed for horizontal carry. I think this knife is a good value for the money.

            What I Would Change About This Product:

            Nothing now

            Final Remarks:

            Whether you’re hiking, camping, or hunting, this Alzafast Horizontal Carry EDC Fixed Blade Knife is built for all outdoor needs. The sharp 1095 high carbon steel blade of the hunting knife tackles food prep, wood carving, and survival tasks. The full tang knife is designed with precision in mind and feels great in your hand. The sheath is made using selected high quality leather and it provides secure storage for this knife.  The horizontal carry may take a bit of getting used to but it works well when you get used to it.  Check out this knife, I bet you will like it.

            If you are interested in this product, click here.  If you are interested in similar products, click on the link below and it will take you to my EDC Fixed Blade Knife page, Thanks for reading this product review.

            Go To EDC Fixed Blade Knives.

            If you have any questions about this product review or anything else related to Everyday Carry (EDC)/Concealed Carry, feel free to leave a comment below and I will be happy to get back to you.

            Thanks,

            Larry

            Founder of Everyday Carry Essentials

              LEAVE A REPLY

              Your email address will not be published
              Required fields are indicated

              LIGHTING EVER LED LEPRO LE FLASHLIGHT

              Product Review

              Nice Flashlight

              Product: Lighting Ever LED LEPRO LE Flashlight

              Price: $7.99

              Durability: Very High

              Best Place To Buy This Product: Amazon.com

              My Overall Rating: 9.0

              Quick Product Overview:

              • SUPER BRIGHT & LONG-LASTING: Equipped by LED, the beam distance of flashlight is up to 492ft. Luminous flux is about 140 lumen in full brightness. Easily light up an entire room.
              • SKID-PROOF DESIGN & WATER RESISTANT DESIGN: Impact and Water Resistant (IPX4), premium aluminum casing resists rust and corrosion.
              • ZOOMABLE FLASHLIGHT: Led flashlight has ability to narrow or widen the area you wish to light. You can stretch the head-pulling zoom to adjust its focus and get spot beam or flood beam you need.

              Specifications Of This Product:

              • LED flashlight is portable small size,
              • Length: 4.2in
              • Diameter: 1.2
              • Weight 128g
              • Very Compact
              • Fit easily into your pocket

              What I Like About This Product:

               The Lighting Ever LED LEPRO LE Flashlight is very bright and very compact in size, and despite its size it is very powerful. This little flashlight is quality built and extremely sturdy, it is a good value for the price. The light quality seem very good and goes from a flood light to a wide beam very easily. Battery life seems to be OK, but time will tell.

              What I Would Change About This Product:

              Nothing right now

              Final Remarks:

              I was looking for another flashlight to put in my new Raptor Sling Bag and I saw this on Amazon at a very good price and thought I would give it a try. While I do not keep a flashlight on my person anymore, I always keep one in my backpack or bags.  You just never know when you will need one. Yes, we all have a flashlight on our phone these days, but they never seem to be bright enough. This flashlight is a really nice size, it fits in your hand very easily and you can drop it in your pocket as well. And yes it is very bright for its size.  I really like the thumb buttons on the end of the flashlight, they really work well.  You need to give this little light a try, it will be worth it.

              If you are interested in this product, click here.  If you are interested in similar products, click on the link below and it will take you to my EDC flashlight page, Thanks for reading this product review.

              Go To EDC Flashlights.

              If you have any questions about this product review or anything else related to Everyday Carry (EDC)/Concealed Carry, feel free to leave a comment below and I will be happy to get back to you.

              Thanks,

              Larry

              Founder of Everyday Carry Essentials

                LEAVE A REPLY

                Your email address will not be published
                Required fields are indicated

                If You Had Your Concealed Carry Permit, Would You Carry A Revolver Or A Semi-Automatic Handgun?

                This is a difficult question, but one that truly needs to be answered if you get your concealed carry permit.  Each one has some pros and cons but you will need to sort that out and figure out which one you will carry,  So lets look into this question.

                Why Use A Revolver?

                Some key advantages of carrying a revolver are high reliability, simplicity of operation, and the ability to fire more powerful cartridges than many semi-automatic pistols. A revolver’s straightforward design makes it a dependable choice for self-defense, particularly for new gun owners. Plus they just look very cool!
                 

                Reliability:

                  • Fewer malfunctions: Unlike semi-automatic pistols, revolvers are not dependent on gas pressure to cycle a new round. This means they are less susceptible to jams, failure to feed, or failure to eject.
                  • No “out of battery” issues: A semi-automatic pistol will not fire if the slide is not fully forward (“in battery”), which can happen if the muzzle is pressed against a target. A revolver’s cylinder design prevents this from occurring.
                  • A “second chance” on a bad round: If a round fails to fire in a double-action revolver, a user can simply pull the trigger again to rotate the cylinder and get a fresh cartridge. A semi-automatic pistol requires a more complex “tap, rack, bang” drill to clear the malfunction.
                  • Tolerates neglect better: While semi-automatics tolerate heavy use well, a revolver is more likely to function properly after sitting loaded for long periods without maintenance.

                Simplicity of use:

                  • Simple controls: Revolvers have fewer moving parts and controls than most semi-automatics, which typically have magazine releases, slide stops, and external safeties. Most revolvers simply require the user to pull the trigger.
                  • No slide manipulation required: People with limited hand strength, such as the elderly or infirm, may find it difficult to rack the slide of a semi-automatic. A double-action revolver requires only a pull of the trigger.

                Versatility and power:

                  • More powerful calibers: The revolver’s simple, rugged design can withstand the pressure of very powerful cartridges, including popular magnum rounds like the .357 and .44 Magnum. These are often too powerful for standard semi-automatic actions.
                  • Multi-caliber functionality: Many revolvers can fire multiple, less powerful calibers from the same cartridge family. For example, a .357 Magnum revolver can also fire the less powerful .38 Special and .38 Special +P

                Recoil:

                  • In a revolver, once the hammer drops, the bullet exits the barrel, but nothing else moves. The equivalent amount of energy that just went forward with the bullet is also sent backward to your hand. It may “feel” a little different if you have a very heavy revolver, or one of the new polymer revolvers that flex and “absorb” some of the recoil, but the energy is the same. Your hand will feel pretty much the full force of the forward-traveling bullet.

                Why Use A Semi-Automatic Handgun?

                Semi-automatics can have higher capacity without reloading than revolvers. You’ll see some exceptions, but the basic concept that semi-auto’s use – storing ammunition in the magazine – provides more space for cartridges than the cylinder of a revolver.

                Reliability:

                Most modern guns made by reputable manufacturers are reliable. You have to work pretty hard to find a newly manufactured gun from a major manufacturer that is not reliable enough for practical use. You’ll recognize the names, like Smith & Wesson, Ruger, Springfield Armory, Glock, Taurus, Kimber, Colt and many others. One thing I’ve found is that gun manufacturers really want to please their customers, and most provide excellent service.

                Recoil:

                A given cartridge will have the same “recoil” regardless of whether it’s fired from a revolver or semi-automatic. What does differ is the recoil perception, or “felt recoil.”

                With a semi-automatic, a lot happens to dissipate the felt recoil impulse. The energy going backwards is the same, but it feels different. Some is used to move the slide backward against pressure of the recoil spring. Some bleeds off moving the barrel. The whole process of motion in the gun is a little more indirect and drawn out, so that same recoil impulse may “feel” more drawn out than in a revolver.

                In general, a semi-automatic of the same power level and weight will generally “feel” like it recoils less than a revolver. Heavier handguns of either style will have less “felt” recoil than ultralight models.

                Capacity:

                Semi-automatics usually can have higher capacity of bullets than revolvers. You may see some exceptions, but the basic concept that semi-auto’s use – storing ammunition in the magazine – provides more space for cartridges than the cylinder of a revolver. It would be kind of clumsy to have a revolver cylinder that held fifteen rounds or so.

                What you need to think about is does capacity matter to you? What kind of use will you have for your handgun?

                  • Recreation?
                  • Hunting?
                  • Home protection?
                  • Concealed carry?

                For many of these uses, capacity may not be a deciding factor. Just because one handgun holds more rounds than the other, that doesn’t mean it’s better?

                Short trigger stroke:

                In a semi-automatic handgun, a short trigger stroke refers to a trigger that requires minimal movement to fire the gun and reset for the next shot. This is a highly desired feature for competitive and experienced shooters, as it provides several advantages related to speed and accuracy.
                 

                There are a few different trigger actions that offer a short stroke:


                Single-action only (SAO)

                In an SAO pistol, the trigger’s only function is to release the hammer or striker. The reciprocating slide cocks the hammer for every shot.
                  • Trigger feel: The trigger pull is typically very light and has a very short distance of travel.
                  • Pistol examples: The most well-known SAO pistol is the M1911. 
                 

                Striker-fired

                Striker-fired pistols use a spring-loaded striker instead of a hammer. For these guns, a shorter trigger stroke is achieved through design and aftermarket modifications. 
                  • Trigger feel: The trigger pull is often consistent and has a shorter travel than a traditional double-action pistol, making it easy to master.
                  • Pistol examples: Many modern pistols are striker-fired, including Glocks, Smith & Wesson M&P, and SIG Sauer P320. 
                 

                Double-action/single-action (DA/SA)

                On a DA/SA pistol, the first shot has a long, heavy double-action pull, which then cocks the hammer. All subsequent shots are fired in a short, light single-action mode. 
                  • Trigger feel: The shorter, single-action pull allows for very fast and accurate follow-up shots.
                  • Pistol examples: Beretta 92, CZ 75, and SIG Sauer P226 are common DA/SA pistols. 

                Complexity:

                A semi-automatics pistol may be considered more complex, they generally do have more buttons and levers than a revolver does. Assuming one has already been trained on basic gun operation and safety through professional instruction like the NSSF First Shots program, a revolver is pretty simple. Put cartridges in the holes, close the cylinder and pull the trigger. Semi-auto’s have more steps. For example, after inserting a magazine full of cartridges, one must generally “rack the slide” to load a cartridge from the magazine into the chamber. Many models of semi-auto’s also have safety or de-cocker levers the change the firing status of the gun.

                But let’s get real. We live in an age where we learn all sorts of new skills like texting, beaming pictures around the internet and operating the office Keurig machine. Learning the basic safe operation of any handgun, revolver or semi-automatic, is not really a show stopper is it?

                So How Do You Choose?

                I think the very best way to pick which gun is right for you is to try a few of each type. not just a few rounds but 20-30 rounds in each type.  After that you will see which ones work best for you. Some people are more comfortable with revolvers. others are more comfortable with semi-automatics. The most important decision is how comfortable are you with that handgun? If you like it, and are comfortable with it, you’ll shoot it more. You’ll become proficient and confident and that’s what really matters.

                Final Comments

                OK so it is the moment of truth, which way should you go?  It turns out that this is a personal decision that you have to make.  There are plenty of good reasons that could make you go either way, but there is not one answer that is correct.  It is time to weigh out each option and find out which reasons are most important to you.  If you have read my articles then you know which way I would go.  The big things that I look at are reliability, ammo capacity and which type of handgun that I shoot better. 

                If you have any questions about this post or anything related to Everyday Carry (EDC), feel free to leave a comment below and I will be happy to get back to you.

                All the best,

                Larry

                Founder of EDC Essentials

                  LEAVE A REPLY

                  Your email address will not be published
                  Required fields are indicated

                  CCANKU C1101 FIXED BLADE KNIFE

                  Product Review

                  Handy Little Knife

                  Product: Ccanku C1101 Fixed Blade Knife

                  Price: $19.99

                  Durability: High

                  Best Place To Buy This Product: Amazon.com

                  My Overall Rating: 8.5

                  Quick Product Overview:

                  The Ccanku C1101 Fixed Blade Knife is a great tool for camping, hunting, hiking, survival and home use !! And with hanging clip on handle, more convenient for you to carry, you can hang it on your bag, belt, etc. You can have confidence that the blade will not slip during use.  The blade is made of D2 steel and the handle is made of stainless steel, with the security of the Kydex sheath, it creates a tight hold when not in use

                  Specifications Of This Product:

                  What I Like About This Product:

                  This knife, despite its rather unique shape is not a bad knife. This knife is very sharp right out of the box, it is very sturdy and has very nice Kydex sheath. It appears to be an excellent value for the price that I paid. 

                  What I Would Change About This Product:

                  Nothing yet

                  Final Remarks:

                  This is not the best knife that I have reviewed but it is not the worst either.  But it does work as it should so that says a lot about this knife.  If it appeals to you and you like this style of knife, then give it a try.

                  If you are interested in this product, click here.  If you are interested in similar products, click on the link below and it will take you to my EDC Fixed Blade Knives page, Thanks for reading this product review.

                  Go To EDC Fixed Blade Knives.

                  If you have any questions about this product review or anything else related to Everyday Carry (EDC)/Concealed Carry, feel free to leave a comment below and I will be happy to get back to you.

                  Thanks,

                  Larry

                  Founder of Everyday Carry Essentials

                    LEAVE A REPLY

                    Your email address will not be published
                    Required fields are indicated

                    I Finally Got My HI-POWER Back!

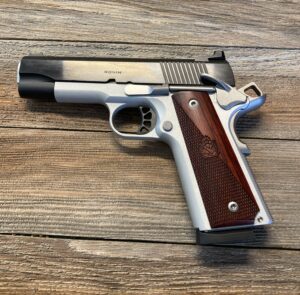
                    In one of my previous articles I mentioned that I made a very big mistake some years ago. I was in a bad financial need and I had to sell two of my handguns:  a Springfield Armory 1911, .45ACP (top picture) and a Browning Hi Power Mark 3 9mm (bottom picture).  I regreted that sale for many years!  The 1911 and Hi-Power was both modified at Novak’s Sights with special sights and reliability work that made them shoot great and they were completely reliable.  I really hated to sell those two handguns, they were sweet! That taught me that it is not a good idea to sell your firearms because you never get a price that they are really worth to you.

                    But a few years ago I was able to replace my Springfield Armory 1911 that I sold with a new Springfield Armory Ronin 1911 which made me very happy.  They were both .45 ACP, which is a caliber that I really like. It had a little shorter barrel so it will work better as a concealed carry handgun. It had a lot of the same upgrades from the factory that I had done at Novak’s, so it was a good deal for me.

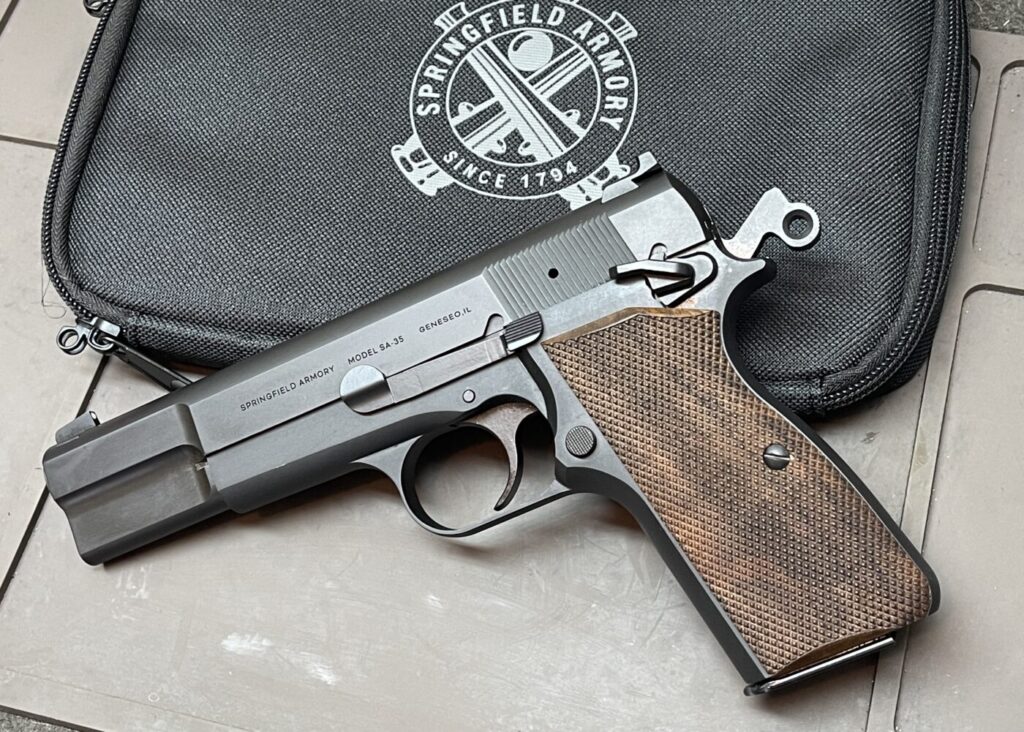
                    The prices on the Browning Hi-Powers have gotten so high that I have not been able to justify buying one, which was difficult for me to realize,  and then came the Springfield Armory SA-35. It is a Hi-Power clone made by Springfield Armory, one of my favorite gun manufactures. I was able to trade my Glock 26, 9 mm for this pistol, at this point I did not want three 9mm pistols, so it seemed like a good deal to me. Let’s talk about the SA-35.

                    Why Has The Browning Hi Power Been So Popular?

                    The Browning Hi-Power has been popular because of its exceptional ergonomics and a slender, high-quality design that makes it feel natural and accurate in the hand, coupled with a storied history as a durable, reliable, and aesthetically pleasing pistol that has been used by military and police forces worldwide. 
                     
                    Key factors for its popularity:
                      • Exceptional Ergonomics:
                        The Hi-Power’s grip angle and overall design make it a very comfortable and natural-feeling handgun for many shooters, contributing to better recoil control and faster sight acquisition. 
                         
                      • Aesthetic Appeal and Quality:
                        The pistol is often praised for its beautiful, delicate blue finish and overall aesthetic, making it a desirable firearm for collectors and those who appreciate classic designs. 
                         
                      • Influential Design and Legacy:
                        As John Browning’s final design and a 1935 creation, it was a groundbreaking firearm, introducing features that influenced many modern handguns and earning it a place as an archetype of the modern pistol. 
                         
                      • Reliability and Durability:
                        The Hi-Power was designed as a military and police workhorse, known for its ruggedness and reliability, leading to its widespread adoption by over 50 countries’ armed forces. 
                         
                      • Historical Significance:
                        Its extensive military service history, including its use by special forces like the British SAS and during World War II, adds to its legendary status. 
                         
                      • Concealability:
                        Despite being a full-sized pistol, its slender slide and frame make it surprisingly concealable for everyday carry. 
                         
                      • Updated Models and Clones:
                        Even after its discontinuation in 2018, the introduction of new versions by FN Herstal and the development of various clones and copies by other manufacturers have kept the Hi-Power platform in the spotlight and accessible to a new generation of shooters. 

                    What Is A SA-35?

                    The Springfield Armory SA-35 is a modern, American-made 9mm handgun that is a modernized take on the classic John Moses Browning P-35 (Browning Hi-Power) pistol designKey upgrades to the SA-35 include a higher 15-round capacity magazine, improved modern sights, an improved trigger, a beveled magazine well for faster reloads, and the removal of the original magazine disconnect safety, all built on rugged forged and cold hammer-forged steel components for durability. 

                     
                    Key Features and Modernizations
                      • Classic Design with Modern Enhancements:

                        It retains the classic lines and ergonomics of the original Browning design but incorporates several significant improvements. 

                         
                      • Enhanced Capacity and Trigger:

                        The SA-35 features a 15-round magazine and lacks the original magazine disconnect safety, which results in a crisper, lighter, and smoother trigger pull. 

                         
                      • Durable Construction:

                        The pistol uses modern, rugged components like forged steel parts for the frame and slide, and a cold hammer-forged barrel, ensuring strength and durability. 

                         
                      • Improved Ergonomics and Controls:

                        Enhancements include a recontoured hammer to prevent “hammer bite,” a modern, extended thumb safety, and improved grips. 

                         
                      • Modern Sights:

                        The SA-35 is equipped with a white-dot front sight and a black, serrated, rear U-notch sight for an improved sight picture. 

                         
                      • Beveled Magwell:

                        The pistol features a beveled magazine well for faster and smoother magazine insertions during reloads. 

                         
                      • Aesthetically Pleasing:
                        The classic matte blued finish with attractive walnut grips provides a “wood and steel” look reminiscent of classic firearms. 

                    How Does The Springfield Armory SA-35 Compare To The Browning Hi Power?

                    The SA-35 is Springfield Armory’s modern interpretation of the classic Browning Hi-Power, retaining the original’s classic aesthetic while incorporating updated features like a lighter single-action trigger, a 15-round magazine capacity, a modern sighting system, a ring hammer, and a drop-safe design. The SA-35 is generally a more budget-friendly option and offers a slightly different shooting experience with its enhanced ergonomics and trigger compared to the original FN High Power. 

                     
                    Similarities:
                      • Classic DesignBoth pistols share the iconic look and overall dimensions of the original Hi-Power. 
                         
                      • All-Steel ConstructionBoth are full-size, all-steel-frame handguns with matte blued finishes. 
                         
                      • Single-Action TriggerBoth feature a single-action trigger mechanism. 
                         
                      • Barrel LengthThey have nearly identical barrel lengths of approximately 4.7 inches. 
                         
                      • Magazine CompatibilitySA-35 magazines are compatible with the original Hi-Power. 
                         
                    Differences & Modern Upgrades (SA-35):
                      • Trigger:

                        The SA-35 has a significantly lighter and smoother single-action trigger pull, according to multiple sources. 

                         
                      • Magazine Capacity:

                        The SA-35 includes a 15-round magazine, an increase from the original 10-round Hi-Power magazine. 

                         
                      • Sights:

                        The SA-35 features a modern front white-dot sight and a rear sight with a shelf for tactical reloads, which is an improvement over the original sights. 

                         
                      • Hammer:

                        The SA-35 uses an iconic ring hammer, while early models of the original Browning Hi-Power had a spur hammer. 

                         
                      • Magazine Disconnect:

                        Springfield removed the magazine disconnect, allowing the pistol to fire without a magazine inserted. 

                         
                      • Drop Safety:

                        The SA-35 is engineered to be drop-safe, unlike some earlier versions of the Browning Hi-Power. 

                         
                      • Grips:

                        The SA-35 features traditional checkered walnut grips, providing a classic feel. 

                         
                      • Price Point:
                        The SA-35 serves as a more budget-friendly option compared to the original, often higher-priced, Browning Hi-Power pistols. 
                     

                    What Do I Like About The Springfield Armory SA-35?

                    First and foremost the Browning Hi-Power 9mm handguns has to be the best looking handgun ever made, in my opinion and Springfield Armory did a great job making this new pistol and replicating the Hi-Power. Also this Hi-Power clone is made in the USA, instead of going overseas where things are much cheaper to manufacture.  Next it is one of the smoothest shooting handguns on the market today. The grip angle and overall design works really well for me and the accuracy is the best I have used right out of the box.

                    What Do I Dislike About The Springfield Armory SA-35?

                    I can’t say I dislike much about this handgun, because it’s a great full sized 9mm handgun that really works well.  But there are a couple of things that I am disappointed about: 1) The handgun only comes with one magazine!  Come on Springfield Armory, most every handgun on the market today comes with 2 or 3 magazines.  One magazine is not enough for me, I need at least two so I have one extra magazine as a backup. So I will need to buy at least one more, and they are about $30 each, for a good one. 2) I am a left-handed shooter and this handgun only has a safety on the left side for right-handed shooters – bummer!  Since this is a single-action handgun, the best way to carry this firearm effectively  is “cocked and locked”.  That means a bullet in the chamber, the hammer is cocked and the safety in on. Then to shoot the firearm you just release the safety and pull the trigger. So I will need to contact a gunsmith and have them put in a ambidextrous-safety so that I can operate the safety using my left thumb. This  is something that all of us “left-handed” shooters face.

                    What Modifications Will I Do To My Springfield Armory SA-35?

                    As I mentioned above there are a couple of things that I need to do to make this pistol 100% in my book. 1)  I need to find an Ambidextrous Safety that I like so that I can use the safety quickly and easily when needed as a left-handed shooter.  There are a few ambi-safeties on the market and I need to decide which one I should buy?  The one that was recommended to me by a gunsmith was made by Cylinder & Slide and they are very nice, but the levers are very long and I am not sure if that will work for me.  There is another one made by BH Spring Solutions that is much shorter but I am not sure if the quality matches with the Cylinder & Slide safety. So I need to do some more research and talk to a few more people to help me make up my mind. 2) The second thing that I need to do is buy 1-2 Extra Magazines.  I do not mean cheaper aftermarket magazines but ones made by Springfield Armory.  These are sold anywhere from $54 to $29 each. I found them at Midway USA for $28.99 each, so that is a good price for a Springfield Armory magazine.  Other than those two things that will be the end of my modifications, unless something comes up at a later date.

                    What Holster Will I Carry My Springfield Armory SA-35 In?

                     I used to only wear IWB holster’s from Comp-Tac, that was my go-to holster for all my handguns.  But now as I get older,  I am enjoying OWB holsters, they are more comfortable and with some selective cover garments, they conceal just a well, providing you pick the right OWB holster.  My favorite OWB holster is the Belt Aholster made by the Aholster Company in Telford Tennessee. These holsters are great, and they really conceal very well.  They snap on to your belt in a way that is extremely secure. no threading your belt through the loops, they are a very nice little holster. My other choice is the Ronin Holster made by Gunfighters, Inc. in Rathdrum, Idaho.  I have 3 of there other holsters: (2) Kenai Chest Holsters for my Glock 20 & 30 and (1) Spectre Shoulder Holster for my Glock 19 and they are an excellent holster company.  The Ronin is an OWB holster which I am very interested in trying for my SA-35. I have not ever used one of these holsters but they seem to be a good holster. It is designed to be used as a concealable OWB holster and that is exactly what I am looking for. So I will think about it a while longer and make my mind up soon.

                    Another option that I already utilize are my sling bags, these are used when a holster just won’t work. 1) In the summer when a tee-shirt just does not conceal a handgun, I wear the DBTAC Tactical Sling Bag. It is small, light and easy to conceal a handgun. 2) I am not allowed to carry concealed at work so I use the Maxpedition Sitka Gearslinger Pack as my EDC pack on a daily basis.  It carrys everything that I want with me, including my handgun. This mode of carry is not the best but off-body sling bags are better than not carrying at all.

                    How Will I Use The SA-35?

                    Right now I am just excited to have the Springfield Armory SA-35 back in my gun collection.  Even though it is not a Browning Hi-Power, I feel it is even a better handgun and more accurate too.  Once I put some rounds through it and feel confident of its reliability, it will probably become one of my concealed carry handguns.  I need to shoot at least 500 rounds through it without any malfunctions before I will feel confident of its use.  But until that time it will make a great range gun.

                    Final Comments

                    The Springfield Armory SA-35 Hi-Power is an awesome 9mm handgun.  When it was first produced it had some issues that needed to be tweaked but the folks at Springfield Armory went to work to correct these issues and now they are a good shooting handgun.  I love the fact that these handguns are made in the USA and that this company took the time to make such a close copy and then make the improvements to this gun that the original Browning Hi-Power was lacking.  All in all it is a great 9mm handgun, it feels really good in my hand and shoots very good also.  The one thing I did not mention was that this handgun is an all steel handgun and therefore will be a fair bit heavier then many of the polymer handguns on the market today.  So that means it will be heavier to carry but the extra weight will help to make it more accurate because you will not feel the recoil as much so it will help to stay on target on follow-up shots. This is a great handgun and I am glad to have it  back in my gun safe.

                    If you have any questions about this post or anything related to Everyday Carry (EDC), feel free to leave a comment below and I will be happy to get back to you.

                    All the best,

                    Larry

                    Founder of EDC Essentials

                      LEAVE A REPLY

                      Your email address will not be published
                      Required fields are indicated